앞에서는 nGrinder를 설치하는 과정을 진행했다.
해당 포스팅에서는 Spring Boot로 GET / POST로 API를 하나씩 생성하고 nGrinder에서 테스트 스크립트를 만들고 성능 테스트를 진행한다.
목차
- Spring Boot 프로젝트 생성
- Spring Boot GET / POST 메서드 생성
- nGrinder Quick Start - GET 요청 성능 테스트 생성 및 실행
- nGrinder POST 요청 성능 테스트 생성 및 실행
Spring Boot 프로젝트 생성
스프링 부트 프로젝트를 간편하게 생성할 수 있는 사이트로 가서 https://start.spring.io/ 프로젝트를 하단과 같이 생성한다.
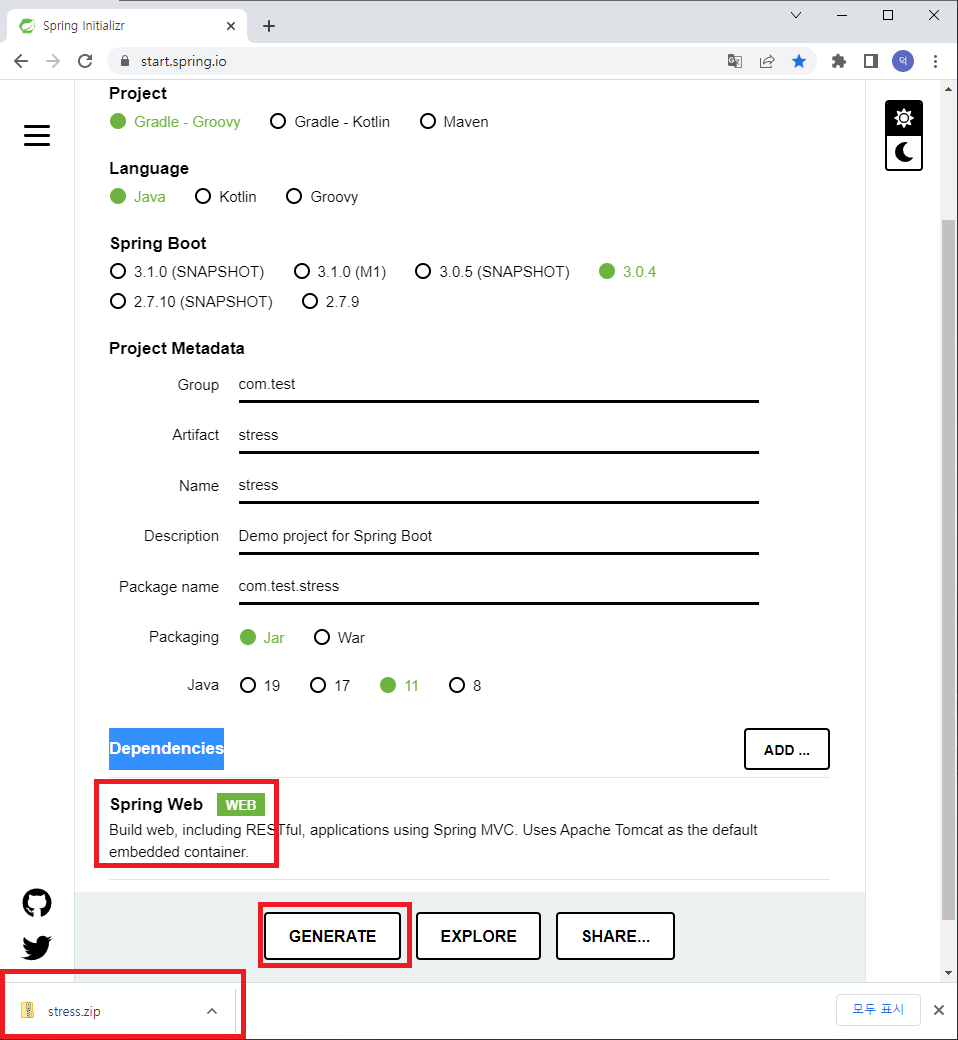
Project 이름 설정 및 의존성 추가
- Group : com.test
- Artifact : stress
- java version : 11
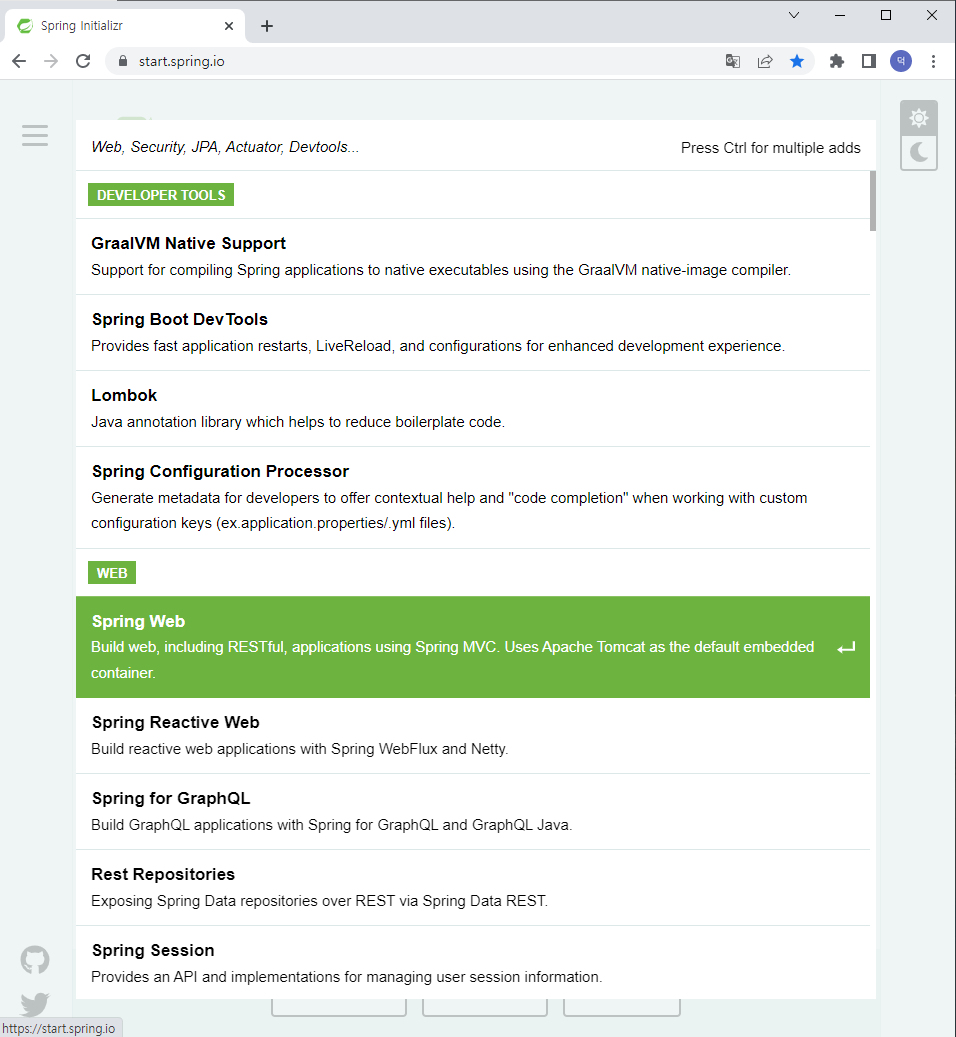
다음과 같이 설정을 하고 의존성을 추가하기 위해서 ADD 버튼을 클릭한다.

Spring Web 추가
@RestController를 사용하기 위해서는 Spring Web 라이브러리가 필요해서 추가한다.
Spring Project 생성
Dependencies에 Spring Web이 추가된 것을 확인할 수 있고 GENERATE를 눌러서 생성한다.
GENERATE를 누르면 stress.zip이 생성 된 것을 볼 수 있다.
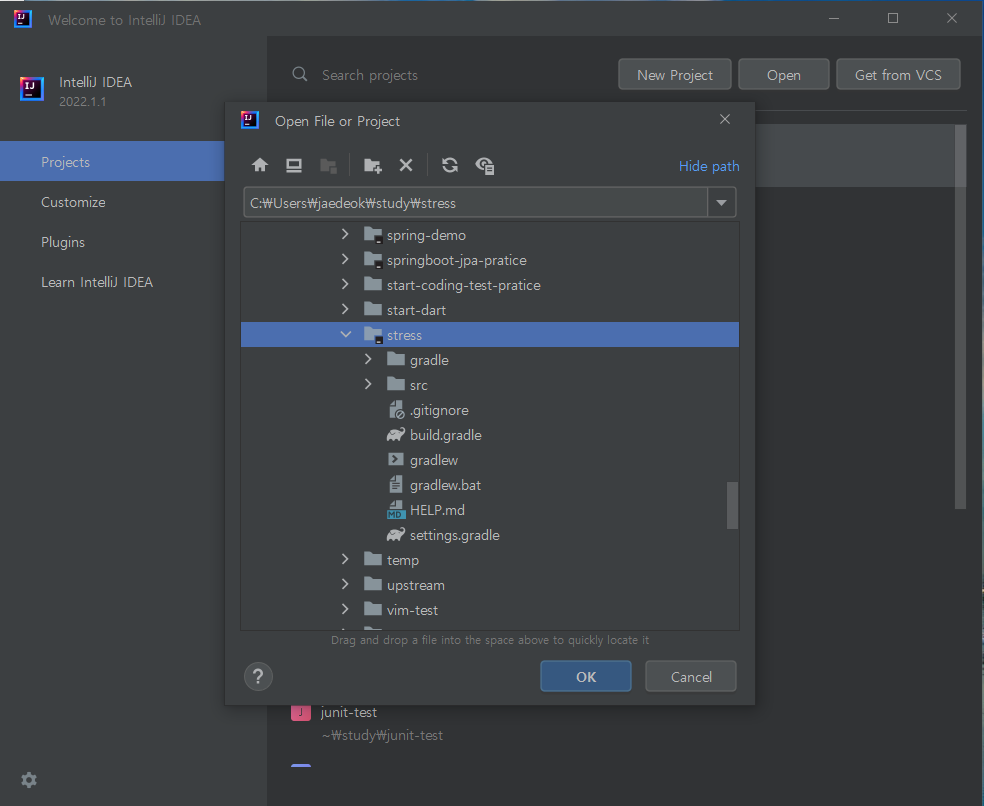
Intellij에서 Project Import
상단에서 설치한 strees.zip 압축을 풀고 intellij를 열고 import 한다.
정상적으로 import가 되면 Gradle이 자동으로 의존성 파일들을 설치한다.
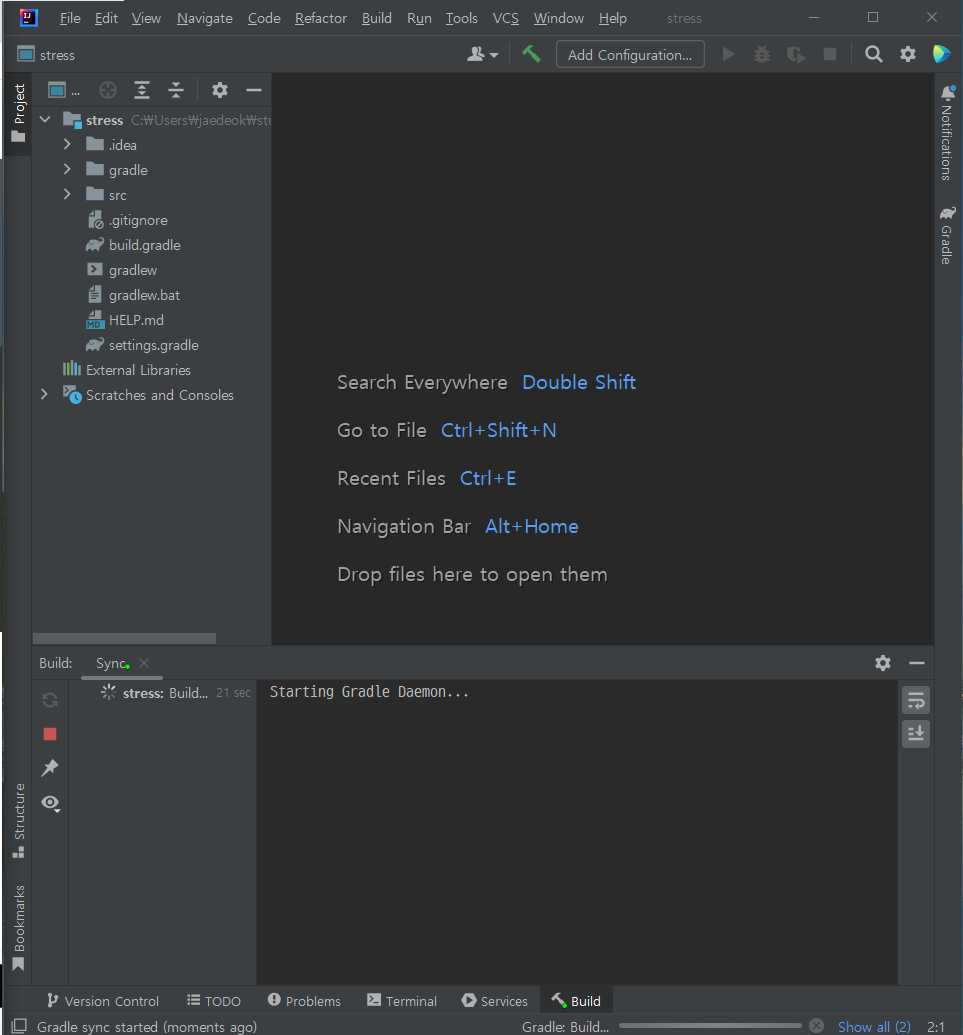
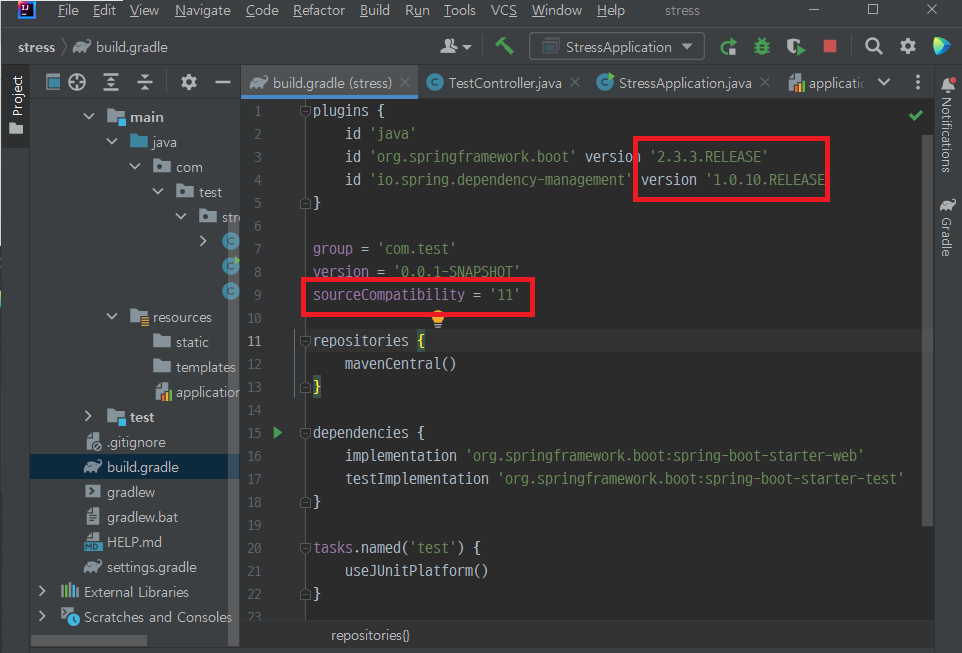
현재는 에러가 발생을 하는데 java 11 버전과 Spring Boot 3.0.4 버전이 호환되지 않기에 build.gradle을 열고 버전을 변경해 준다.
build.gradle spring 버전 변경
기존 3.04, 1.1.0 버전을 2.3.3.RELEASE, 1.0.10.RELEASE으로 변경했다.
다시 의존성을 가져오기 위해서 코끼리 모양의 버튼을 클릭한다.
java 버전도 17에서 11로 변경한다.
- 기존
- id 'org.springframework.boot' version '3.0.4'
- id 'io.spring.dependency-management' version '1.1.0'
- sourceCompatability = 17
- 변경
- id 'org.springframework.boot' version '2.3.3.RELEASE'
- id 'io.spring.dependency-management' version '1.0.10.RELEASE'
- sourceCompatability = 11
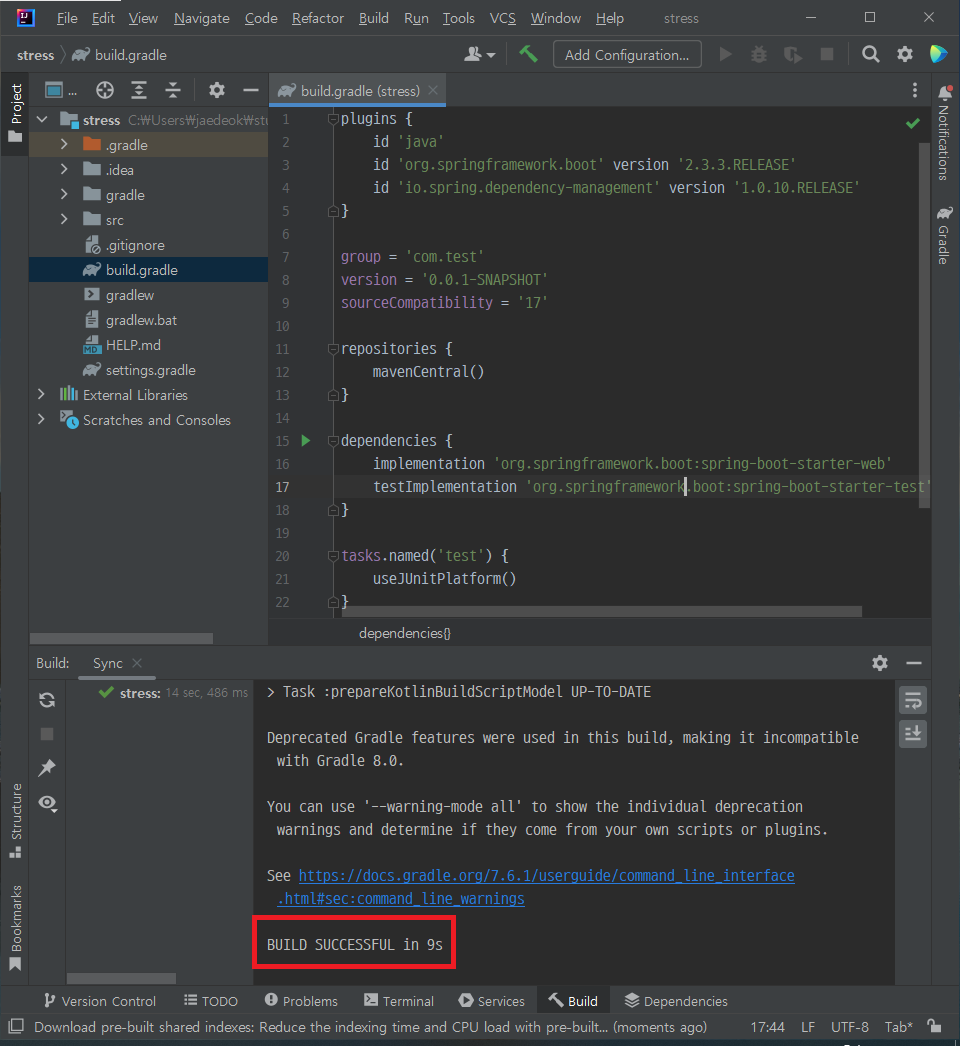
빌드를 다시 실행하고 나면 BUILD SUCCESSFUL가 나오는 것을 확인 가능하다.
Spring Boot API 생성
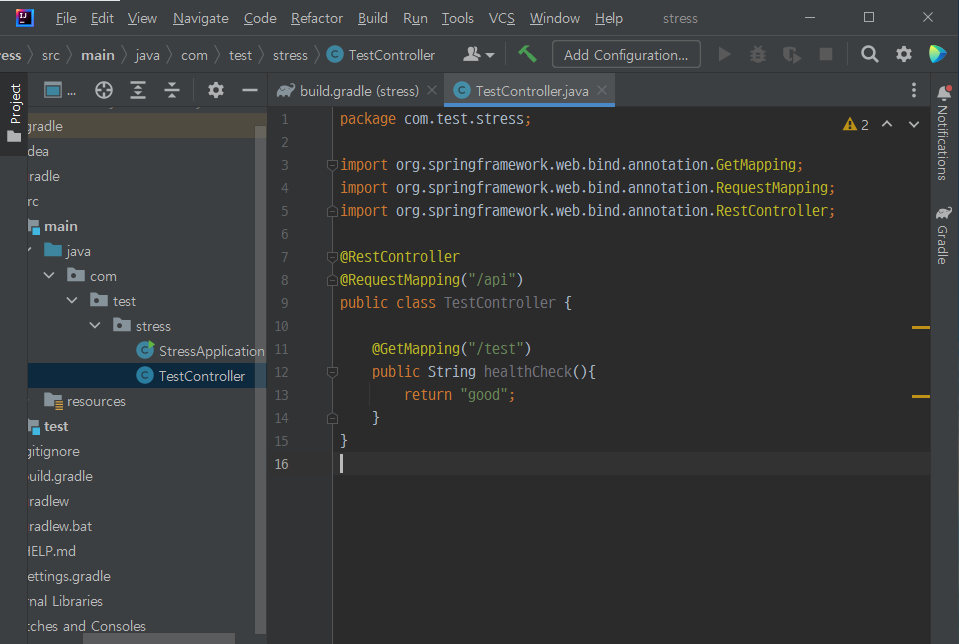
헬스체크 메서드 생성 - GET
TestController를 생성하고 GET /api/test로 요청하면 good을 리턴하는 Controller를 생성한다.
해당 예제에서는 Service, Repository는 구현하지 않는다.
package com.test.stress;

import org.springframework.web.bind.annotation.GetMapping;
import org.springframework.web.bind.annotation.RequestMapping;
import org.springframework.web.bind.annotation.RestController;

@RestController
@RequestMapping("/api")
public class TestController {

    @GetMapping("/test")
    public String healthCheck(){
        return "good";
    }
}
게시물 내용과 파일 정보를 반환하는 메소드 생성 - POST
POST /api/post로 JSON을 요청하는 것을 테스트하기 위해서 PostDto와 TestController에 getPost() 메서드를 생성한다.
PostDto 생성
현재는 테스트를 위해서 PostDto에 FileDto를 하나의 클래스에서 생성해서 구현했다.
변수들을 만들어 주고 getter()와 toString()을 생성한다.
package com.test.stress;

public class PostDto {
    private Long postId;
    private String title;
    private String content;
    private FileDto fileDto;

    public Long getPostId() {
        return postId;
    }

    public String getTitle() {
        return title;
    }

    public String getContent() {
        return content;
    }

    public FileDto getFileDto() {
        return fileDto;
    }

    @Override
    public String toString() {
        return "PostDto{" +
                "postId=" + postId +
                ", title='" + title + '\'' +
                ", content='" + content + '\'' +
                ", fileDto=" + fileDto +
                '}';
    }
}


class FileDto {
    private Long fileId;
    private String fileName;

    public Long getFileId() {
        return fileId;
    }

    public String getFileName() {
        return fileName;
    }

    @Override
    public String toString() {
        return "FileDto{" +
                "fileId=" + fileId +
                ", fileName='" + fileName + '\'' +
                '}';
    }
}
TestController.getPost() 메소드 생성
TestController에 getPost() 메소드를 만들고 파라미터는 json으로 postDto를 받고 로그만 출력하고 다시 리턴해주는 메서드이다.
package com.test.stress;

import org.slf4j.Logger;
import org.slf4j.LoggerFactory;
import org.springframework.web.bind.annotation.*;

@RestController
@RequestMapping("/api")
public class TestController {

    private Logger logger = LoggerFactory.getLogger(getClass());
    @GetMapping("/test")
    public String healthCheck(){
        return "good";
    }

    @PostMapping("/post")
    public PostDto getPost(@RequestBody PostDto postDto) {
        logger.info("{}", postDto);
        return postDto;
    }
}
Spring Boot 애플리케이션을 실행하고 크롬에서 localhost를 입력하고 nGrinder 메인 페이지로 온다.
nGrinder Quick Start - GET 요청 성능 테스트 생성 및 실행
nGrinder 성능 테스트를 진행하기 위해서는 다음 과정으로 진행된다.
- 스크립트 생성
- 테스트 생성
- 테스트 설정
- 테스트 실행 및 모니터링
- 테스트 상세 보고서
이러한 과정을 한 번에 가능하게 해주는 방법이 nGrinder Quick Start이다.
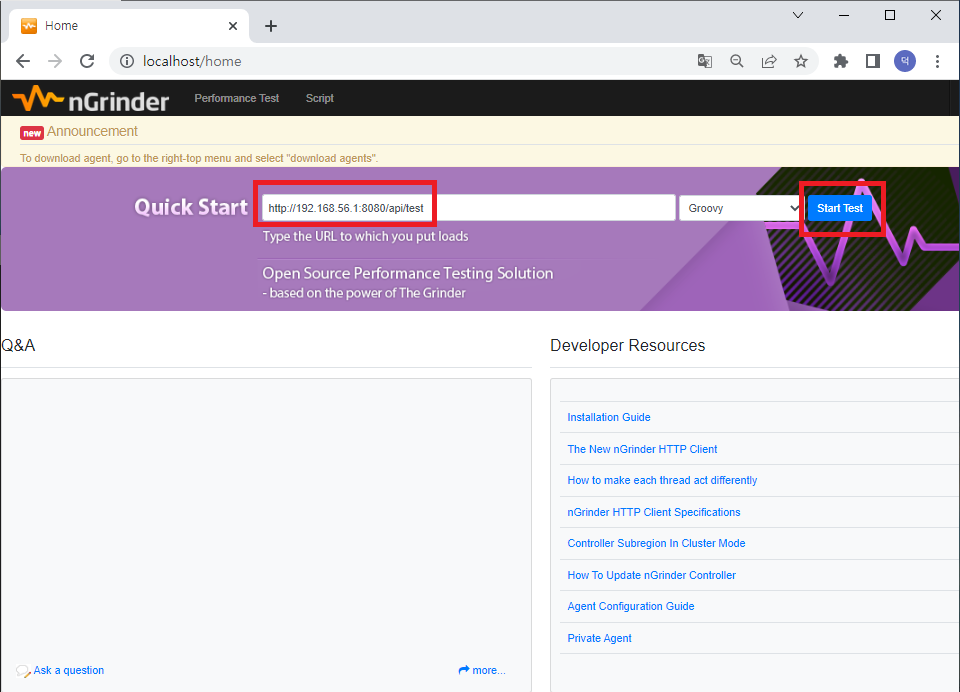
GET /api/test를 호출하는 nGrinder 테스트를 생성한다.
nGrinder에서 호출하기 위한 URL은 localhost로 작성하면 안 되고 cmd에서 ipconfig로 나오는 자신의 내부 ip 또는 target ip를 입력한다.
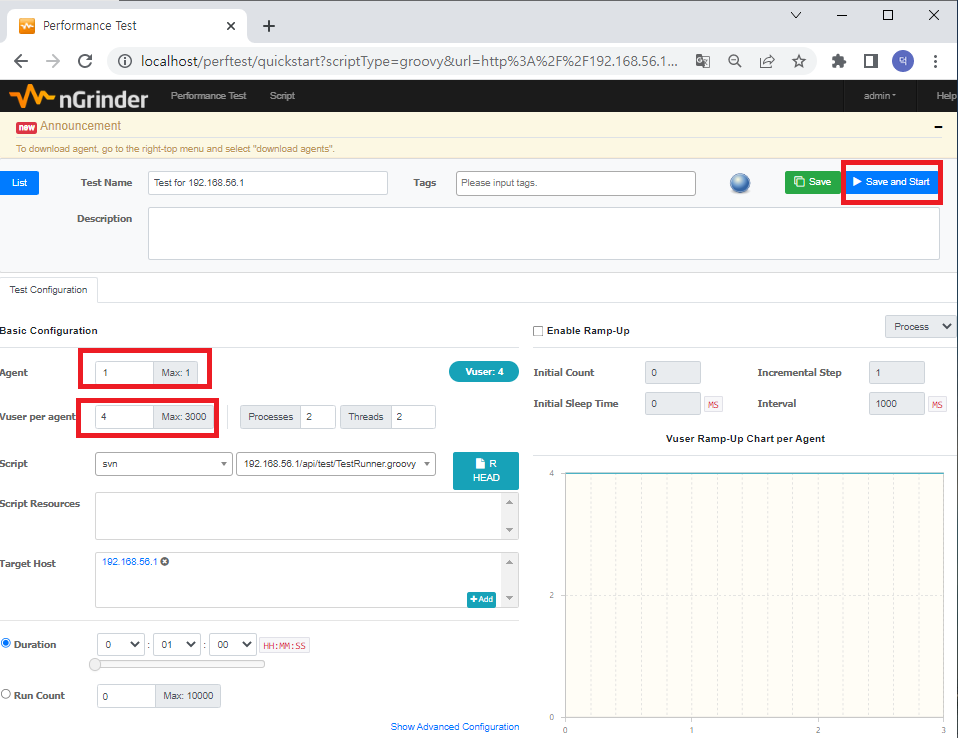
테스트 설정
nGrinder의 테스트 설정 정보는 다음과 같다.
해당 예제에서는 Agent는 1, 가상 사용자는 4명으로 하고 Save and Start 버튼을 눌러서 테스트를 실행한다.
- Agent : 부하를 발생시키는 서버
- Vuser per agent : 에이전트 별 가상 사용자
- Processes
- Threads
- Script : 부하를 발생시키는 스크립트
- Target Host : 부하 타겟 서버
- Duration : 지속 시간
- Run Count : 사용자가 설정한 스레드 당 몇 번의 테스트를 실행할 것인지 지정
- Ramp-up : 점차 부하를 가할 수 있는 기능
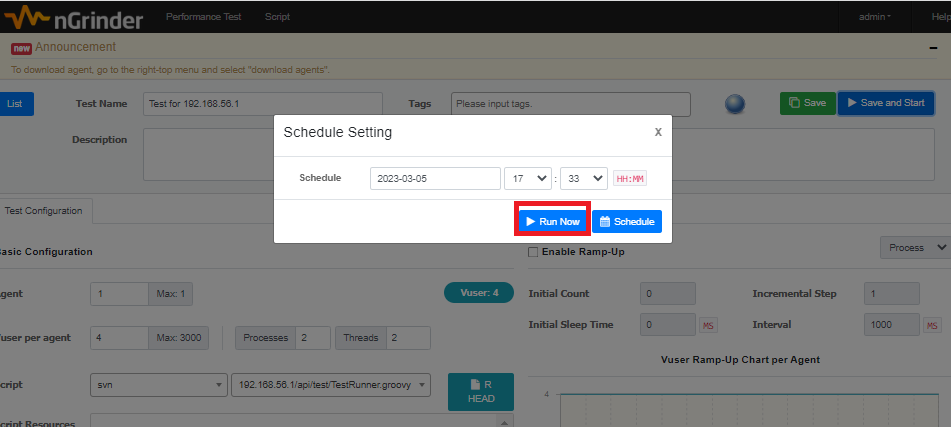
테스트 시작시간 선택
테스트가 바로 시작되게 Run Now 버튼을 누른다.
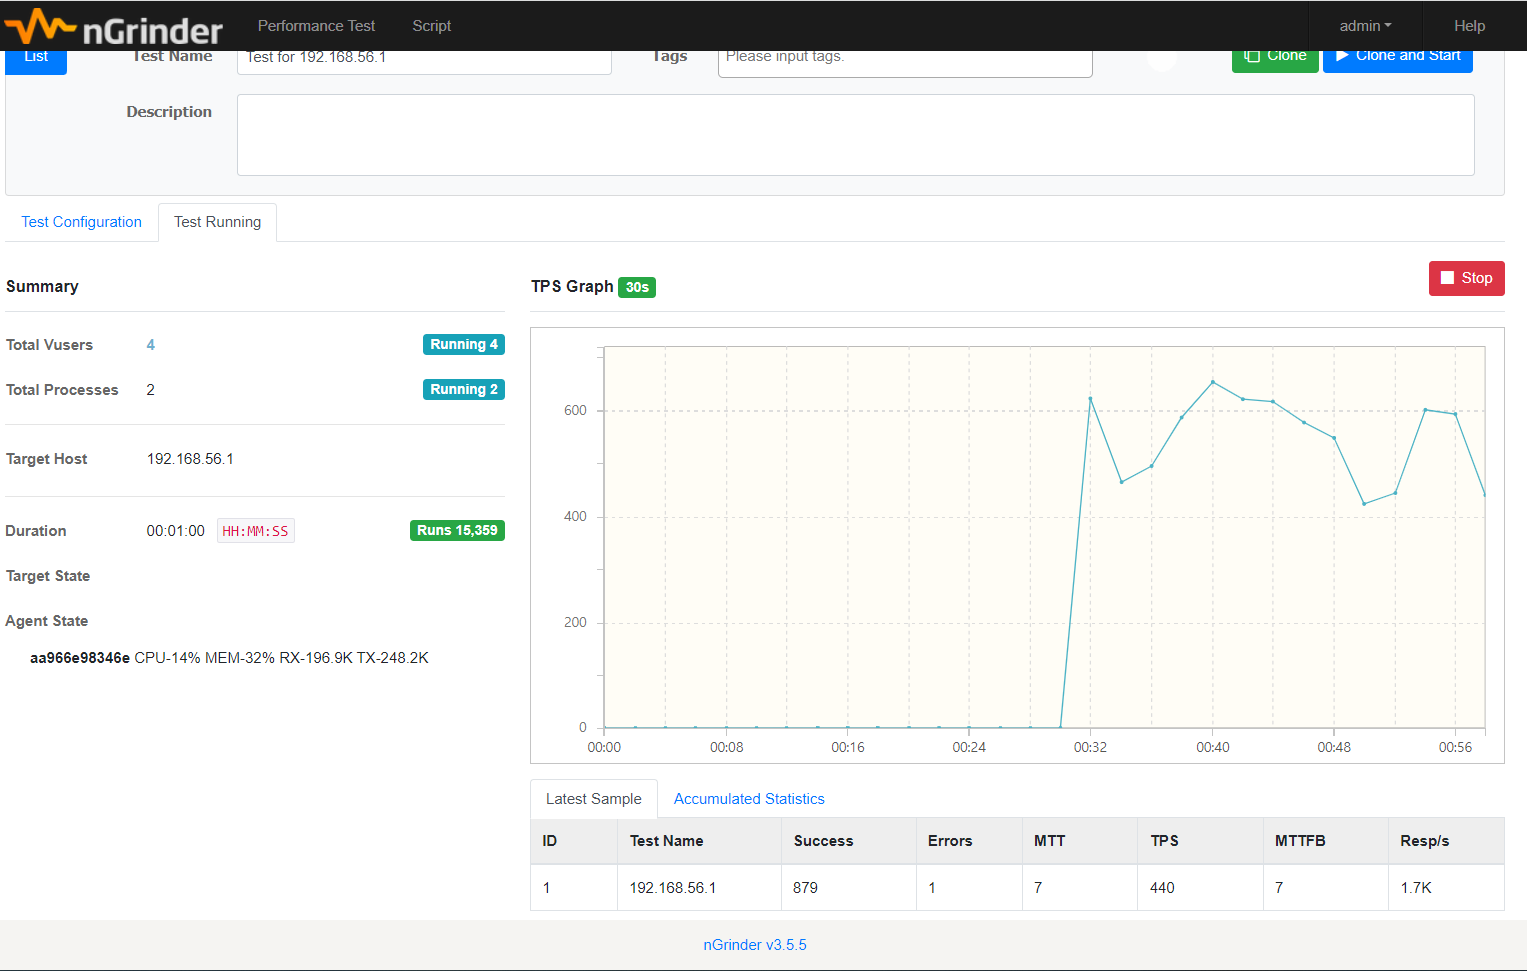
테스트 실행 및 모니터링
Run Now를 누르고 나면 테스트가 실행되면서 그래프가 변동된다.
하단에 요청 성공 횟수와 실패 카운트가 나온다.
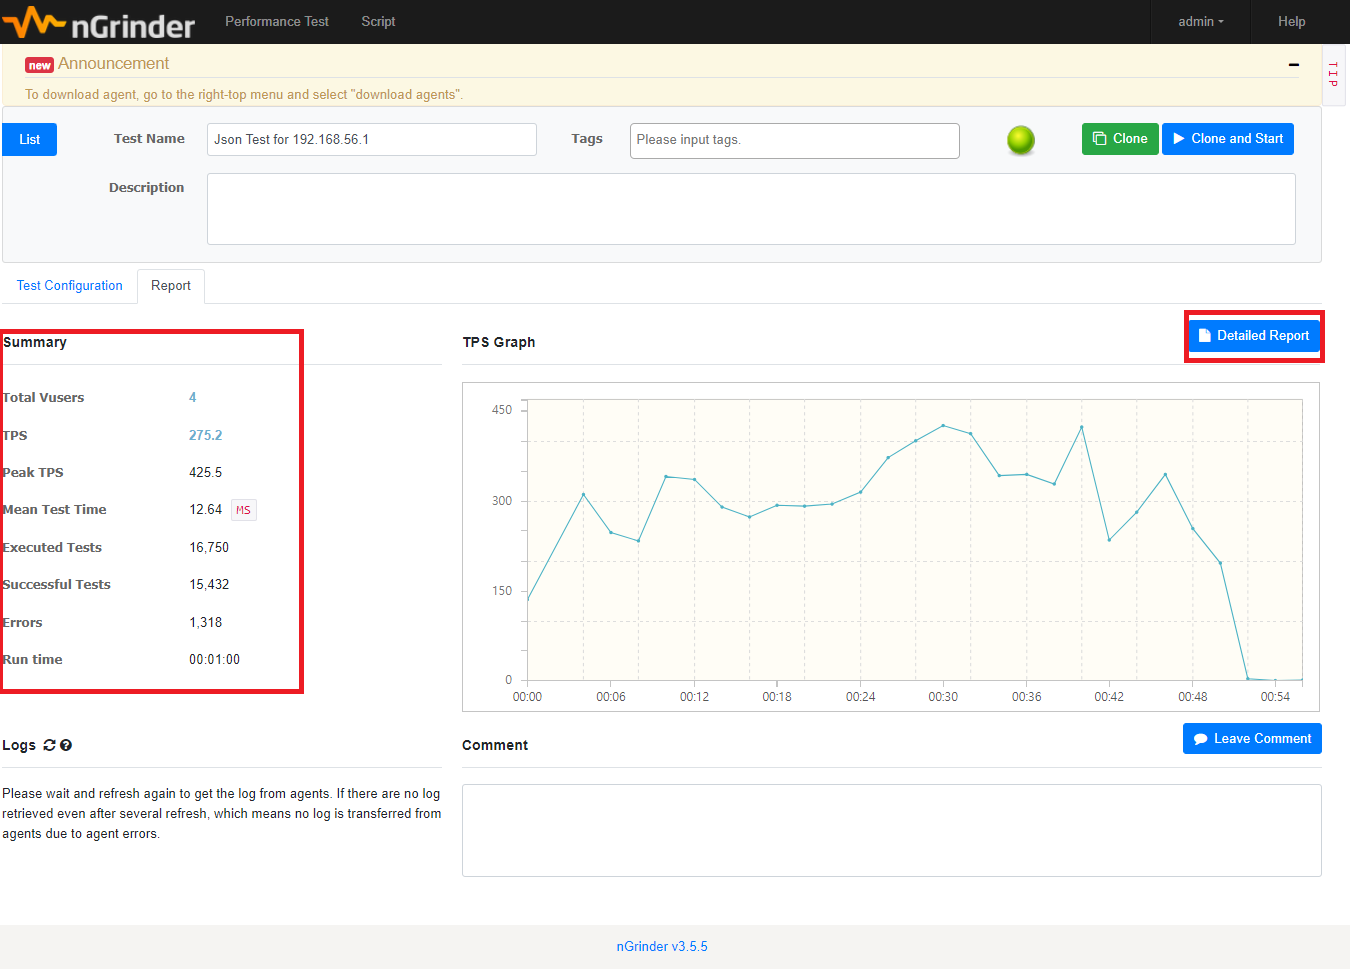
테스트 종료 및 요약
테스트가 종료되면 좌측에는 성능 테스트에 대한 요약이 나온다.
우측에 Detailed Report를 누르면 테스트에 대한 상세 보고서가 나온다.
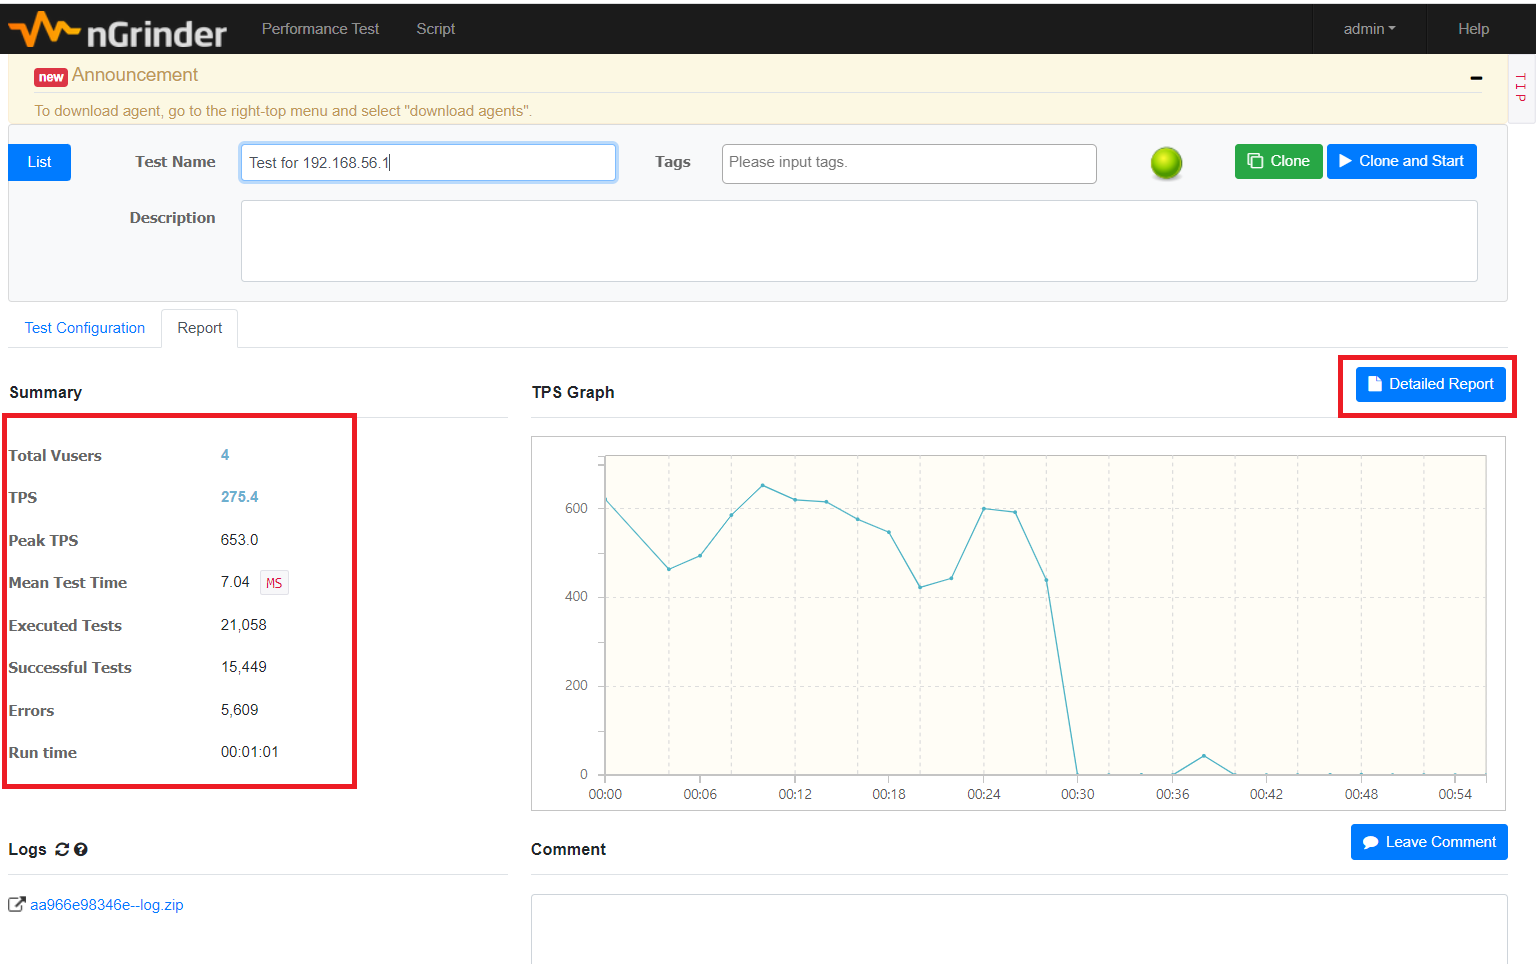
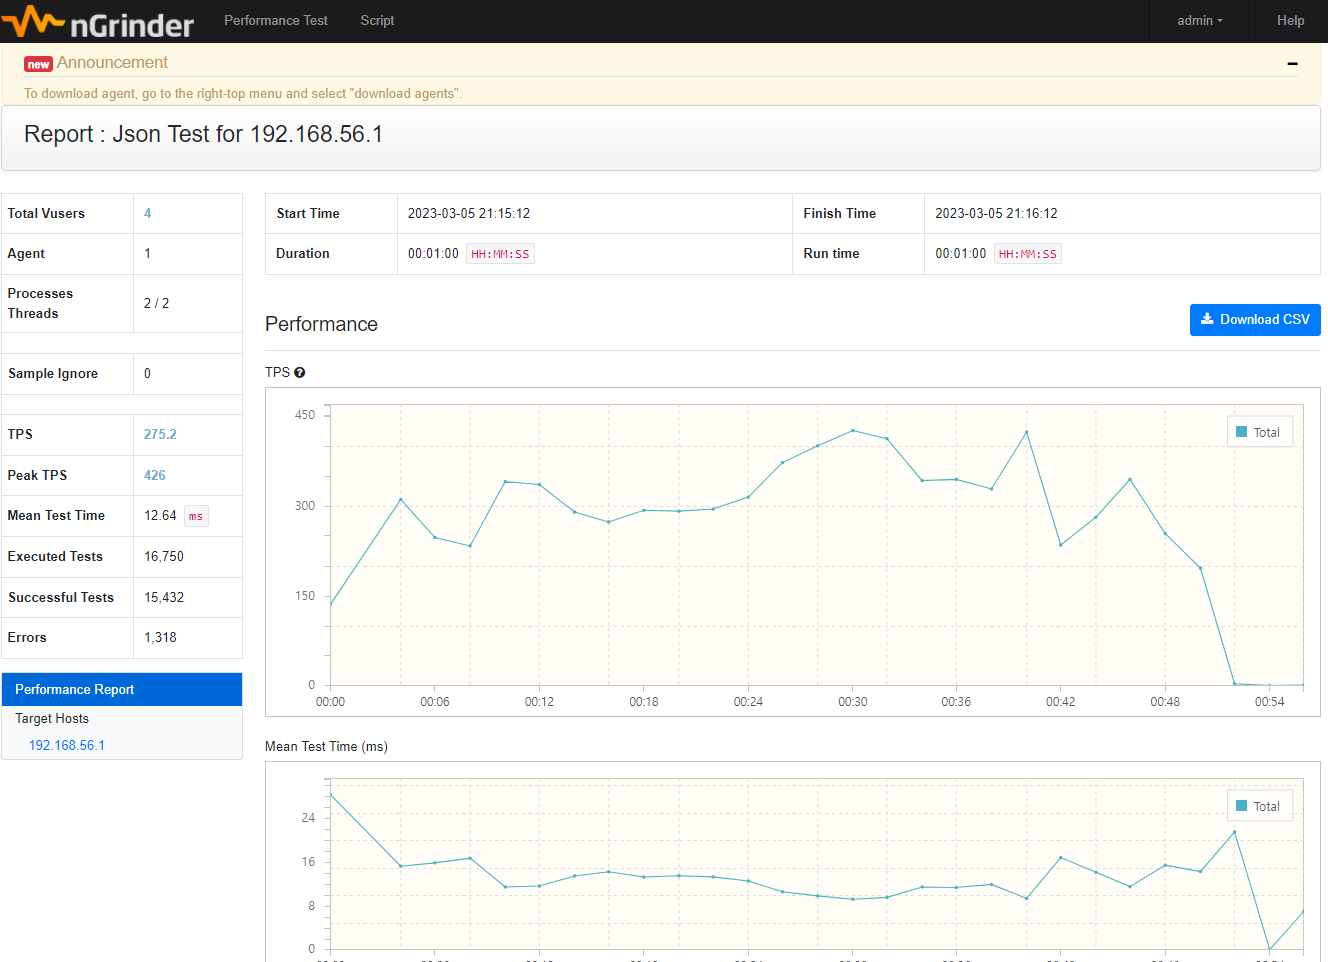
테스트 상세 보고서
요약본과는 다르게 TPS, Mean Test Time과 같이 다양한 정보의 그래프가 나오고 상세하게 테스트 결과가 나오는 것을 확인 가능하다.

nGrinder POST 요청 성능 테스트 생성 및 실행
앞에서는 nGrinder에서 GET /api/test 요청에 대한 테스트를 nGrinder Quick Start 기능을 사용해서 진행했다.
Quick Start 기능은 GET 요청만 가능하기에 이번에는 POST 요청을 성능 테스트하는 스크립트를 직접 생성하고 테스트를 만든다.
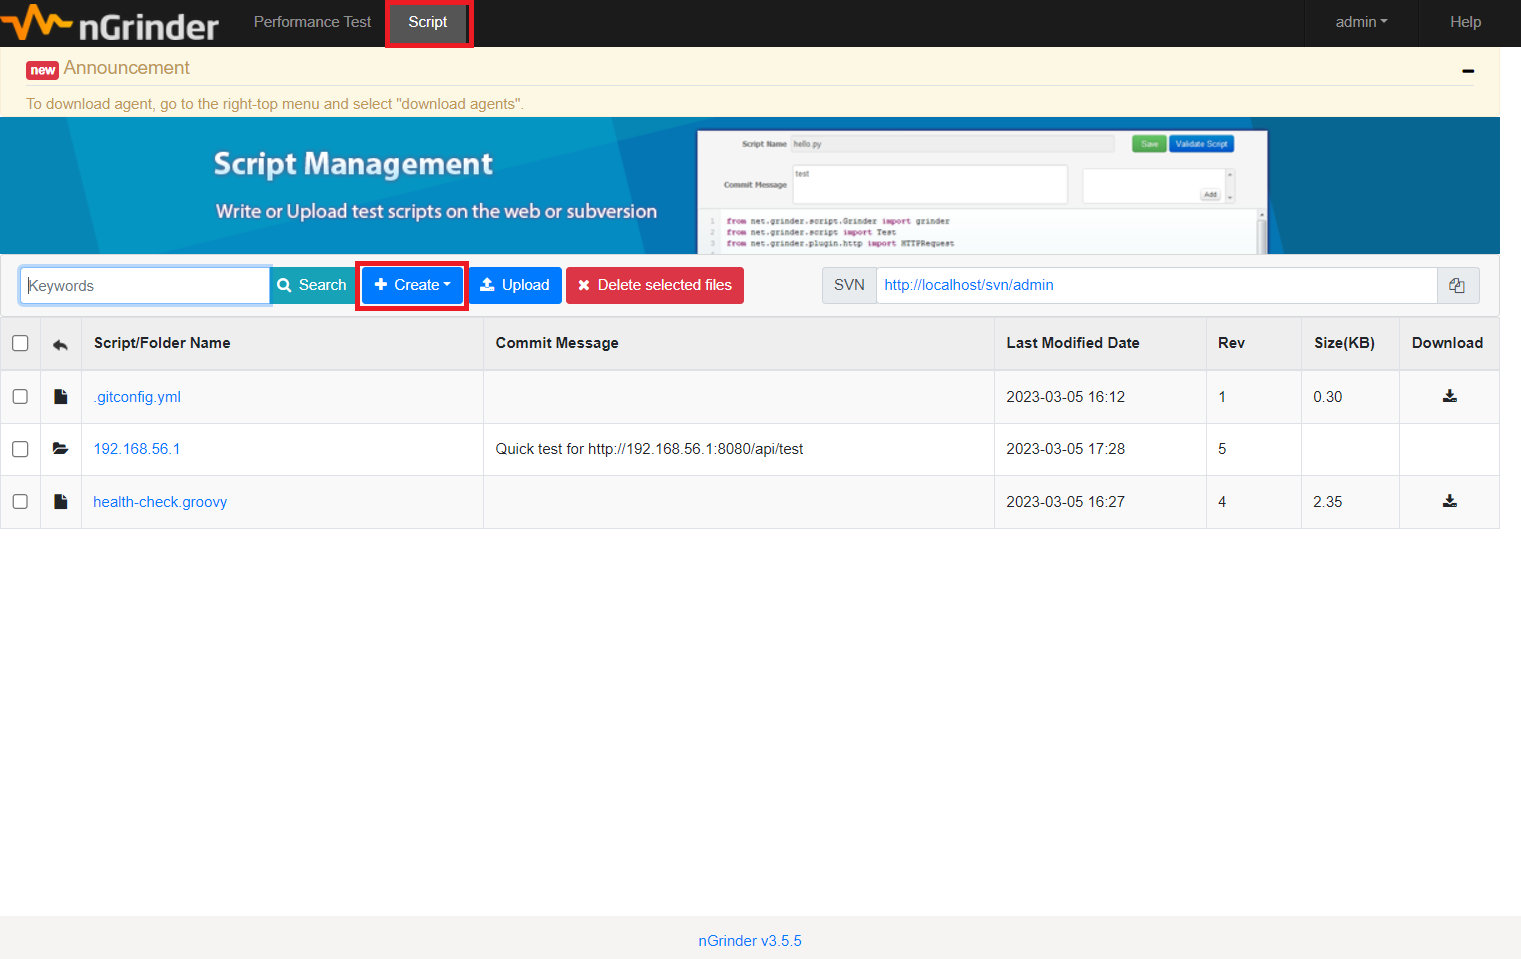
스크립트 생성
메인 헤더에서 Script를 누르고 Create 버튼을 눌러서 스크립트 생성을 진행한다.
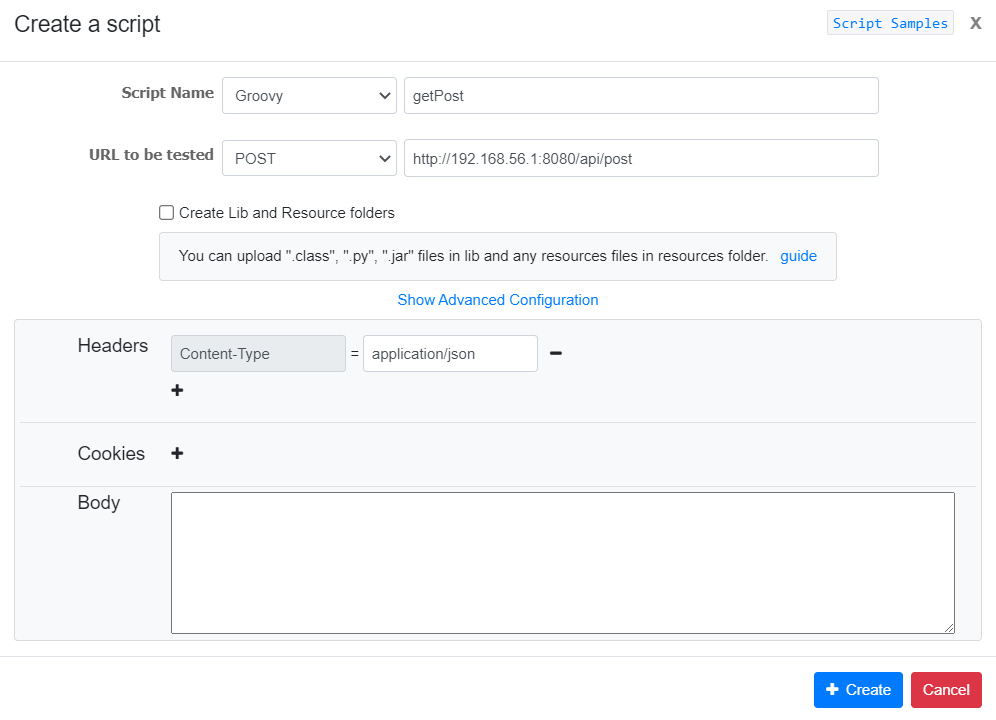
POST /api/test를 호출하기 위한 스크립트를 생성한다.
Body는 현재는 비우고 스크립트에서 추가해 준다.
- script name : getPost
- URL to be tested : POST / http://192.168.56.1/api/test
- Headers : Content-Type=application/json
- Create 클릭
Create 버튼을 누르면 하단처럼 Groovy 언어의 스크립트 코드가 생긴다.
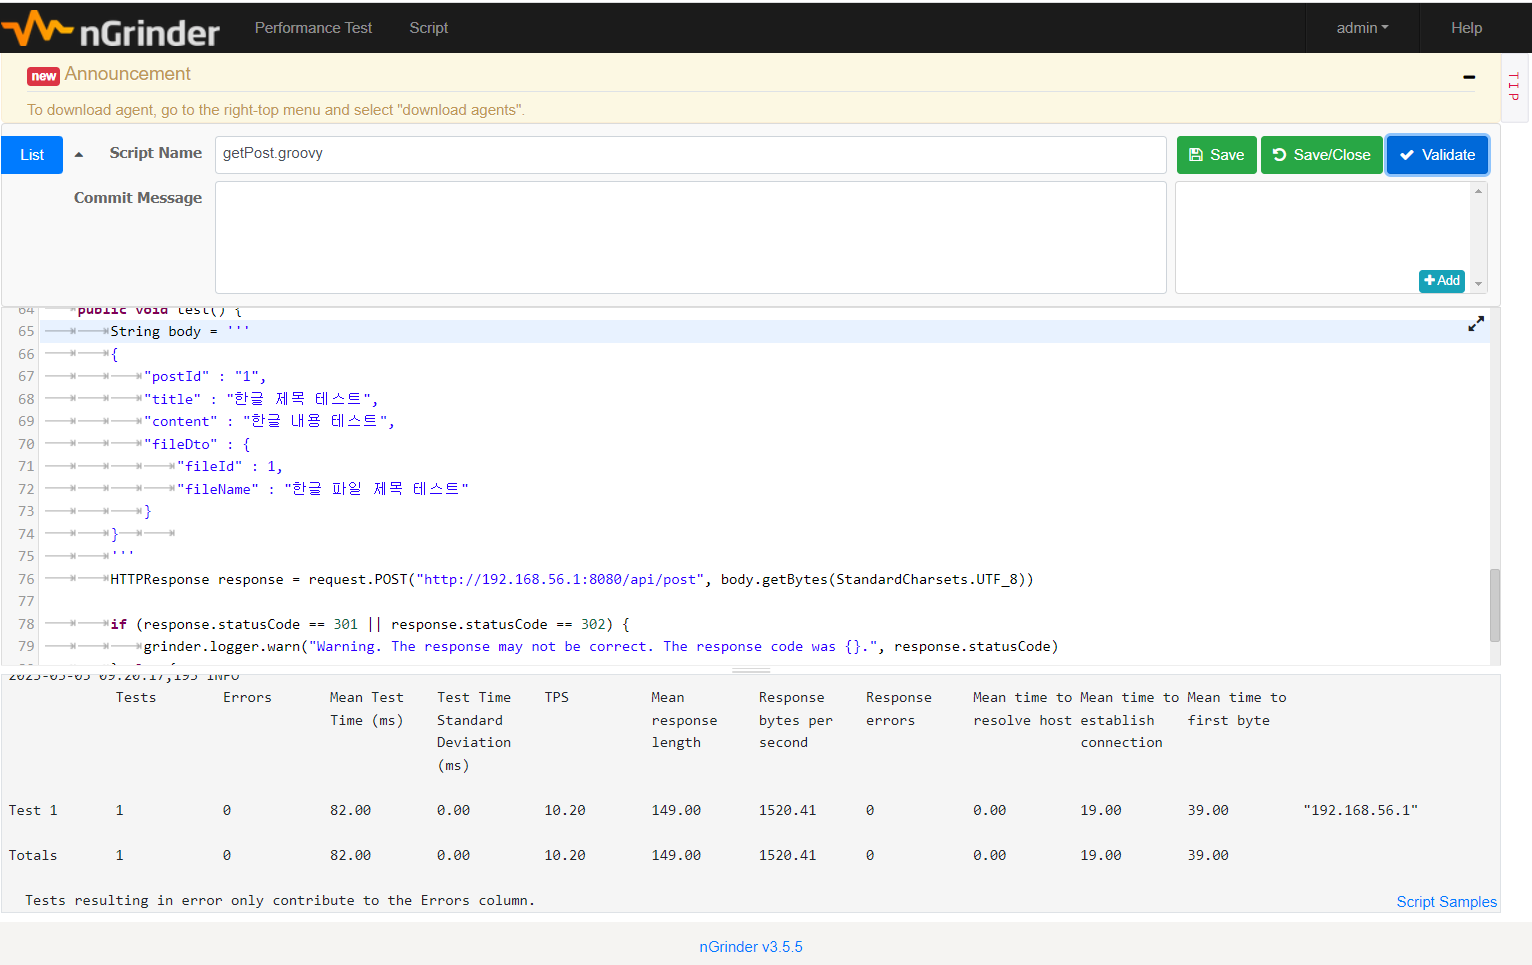
기존 코드에서 하단 코드로 변경을 해준다.
- 65행에 body 변수의 이름으로 PostDto JSON 값을 설정해 준다.
- 20행에 import java.nio.charset.StandardCharsets 추가하고 76행에 기존 body.getBytes() body.getBytes((StandardCharsets.UTF_8)) CharSet을 UTF-8로 설정한다.
위의 코드로 변경하고 Validate 버튼을 누르고 검증을 진행한다.
검증을 진행하면 요청 테스트가 한 개가 성공한 것을 볼 수 있다.
import static net.grinder.script.Grinder.grinder
import static org.junit.Assert.*
import static org.hamcrest.Matchers.*
import net.grinder.script.GTest
import net.grinder.script.Grinder
import net.grinder.scriptengine.groovy.junit.GrinderRunner
import net.grinder.scriptengine.groovy.junit.annotation.BeforeProcess
import net.grinder.scriptengine.groovy.junit.annotation.BeforeThread
// import static net.grinder.util.GrinderUtils.* // You can use this if you're using nGrinder after 3.2.3
import org.junit.Before
import org.junit.BeforeClass
import org.junit.Test
import org.junit.runner.RunWith

import org.ngrinder.http.HTTPRequest
import org.ngrinder.http.HTTPRequestControl
import org.ngrinder.http.HTTPResponse
import org.ngrinder.http.cookie.Cookie
import org.ngrinder.http.cookie.CookieManager
import java.nio.charset.StandardCharsets

/**
* A simple example using the HTTP plugin that shows the retrieval of a single page via HTTP.
*
* This script is automatically generated by ngrinder.
*
* @author admin
*/
@RunWith(GrinderRunner)
class TestRunner {

	public static GTest test
	public static HTTPRequest request
	public static Map<String, String> headers = [:]
	public static String body = ""
	public static List<Cookie> cookies = []

	@BeforeProcess
	public static void beforeProcess() {
		HTTPRequestControl.setConnectionTimeout(300000)
		test = new GTest(1, "192.168.56.1")
		request = new HTTPRequest()

		// Set header data
		headers.put("Content-Type", "application/json")
		grinder.logger.info("before process.")
	}

	@BeforeThread
	public void beforeThread() {
		test.record(this, "test")
		grinder.statistics.delayReports = true
		grinder.logger.info("before thread.")
	}

	@Before
	public void before() {
		request.setHeaders(headers)
		CookieManager.addCookies(cookies)
		grinder.logger.info("before. init headers and cookies")
	}

	@Test
	public void test() {
		String body = '''
		{
			"postId" : "1",
			"title" : "한글 제목 테스트",
			"content" : "한글 내용 테스트",
			"fileDto" : {
				"fileId" : 1,
				"fileName" : "한글 파일 제목 테스트"
			}
		}
		'''
		HTTPResponse response = request.POST("http://192.168.56.1:8080/api/post", body.getBytes(StandardCharsets.UTF_8))

		if (response.statusCode == 301 || response.statusCode == 302) {
			grinder.logger.warn("Warning. The response may not be correct. The response code was {}.", response.statusCode)
		} else {
			assertThat(response.statusCode, is(200))
		}
	}
}
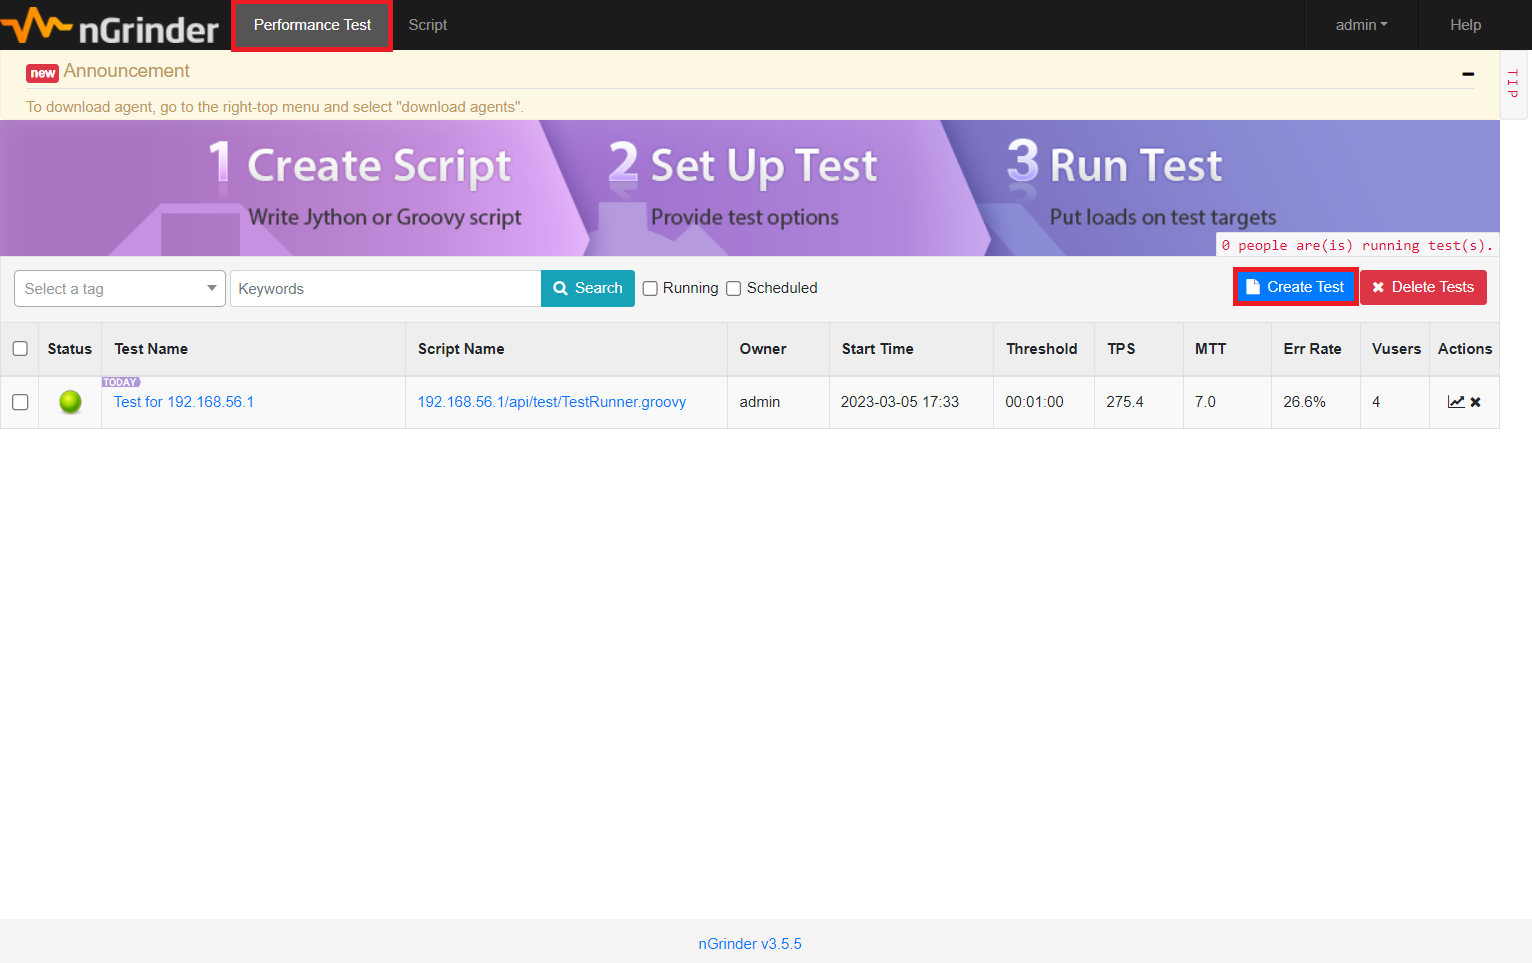
테스트 생성
헤더 상단에 performance Test를 클릭하면 해당 페이지가 나온다.
해당 페이지에서 Create Test 버튼을 눌러서 테스트를 생성한다.
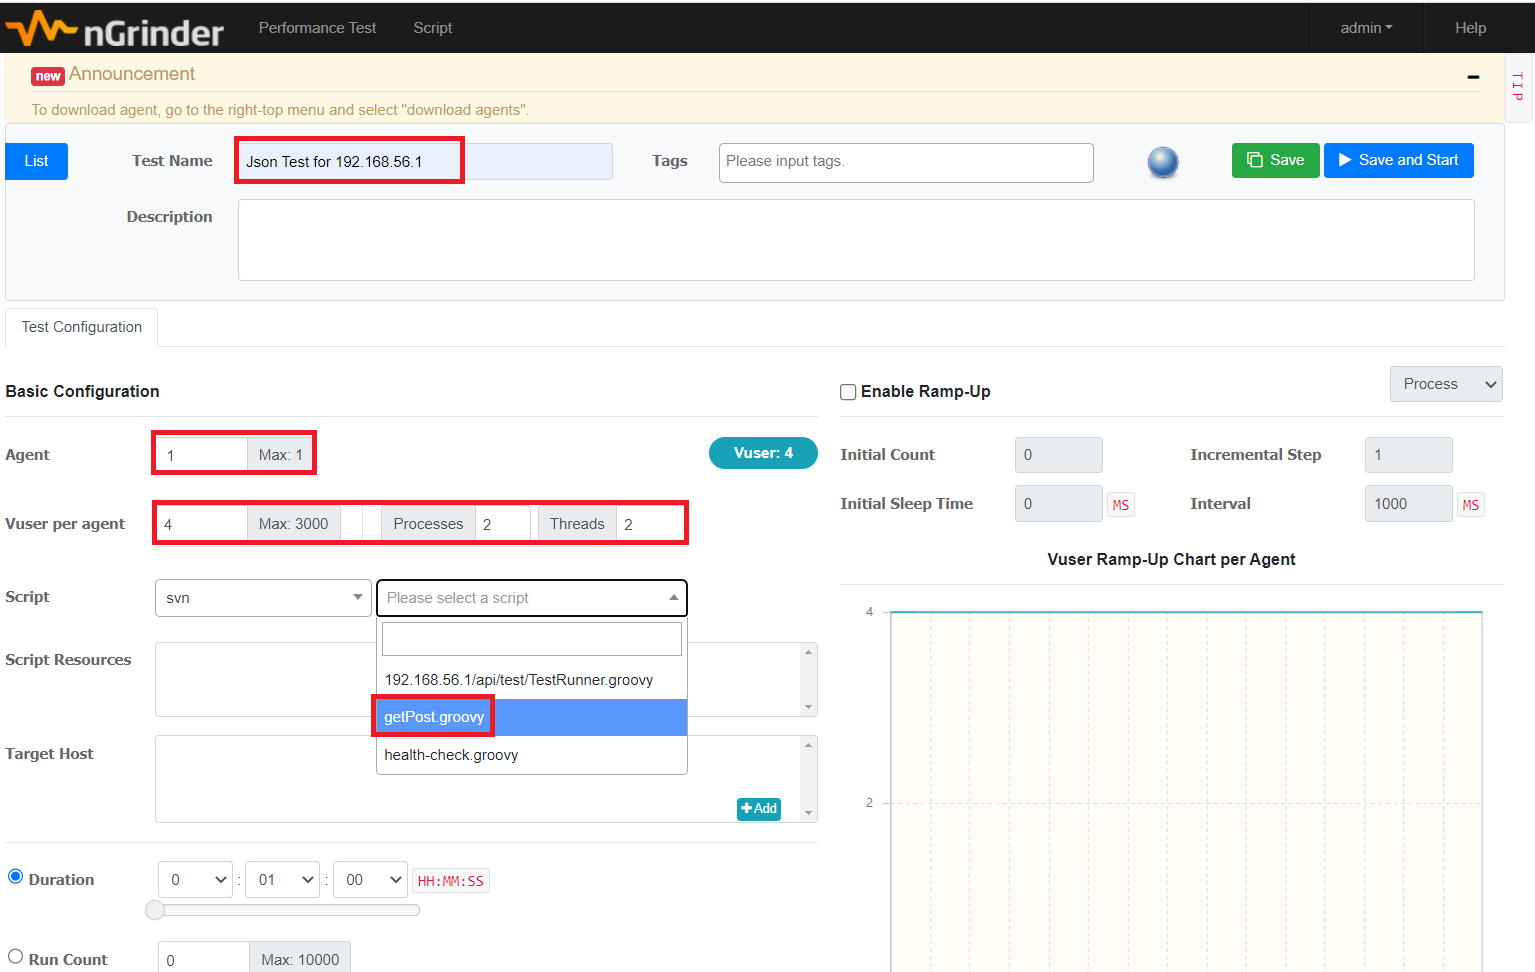
테스트 설정
GET /api/test를 호출하는 테스트를 생성했을 때와 거의 동일하다.
- Test Name : 테스트명은 자신의 기호에 맞게 입력
- Agent : 1명으로 기입
- Vuser per agent : 4명으로 입력
- Script : getPost.groovy
- 방금 생성한 groovy script 선택
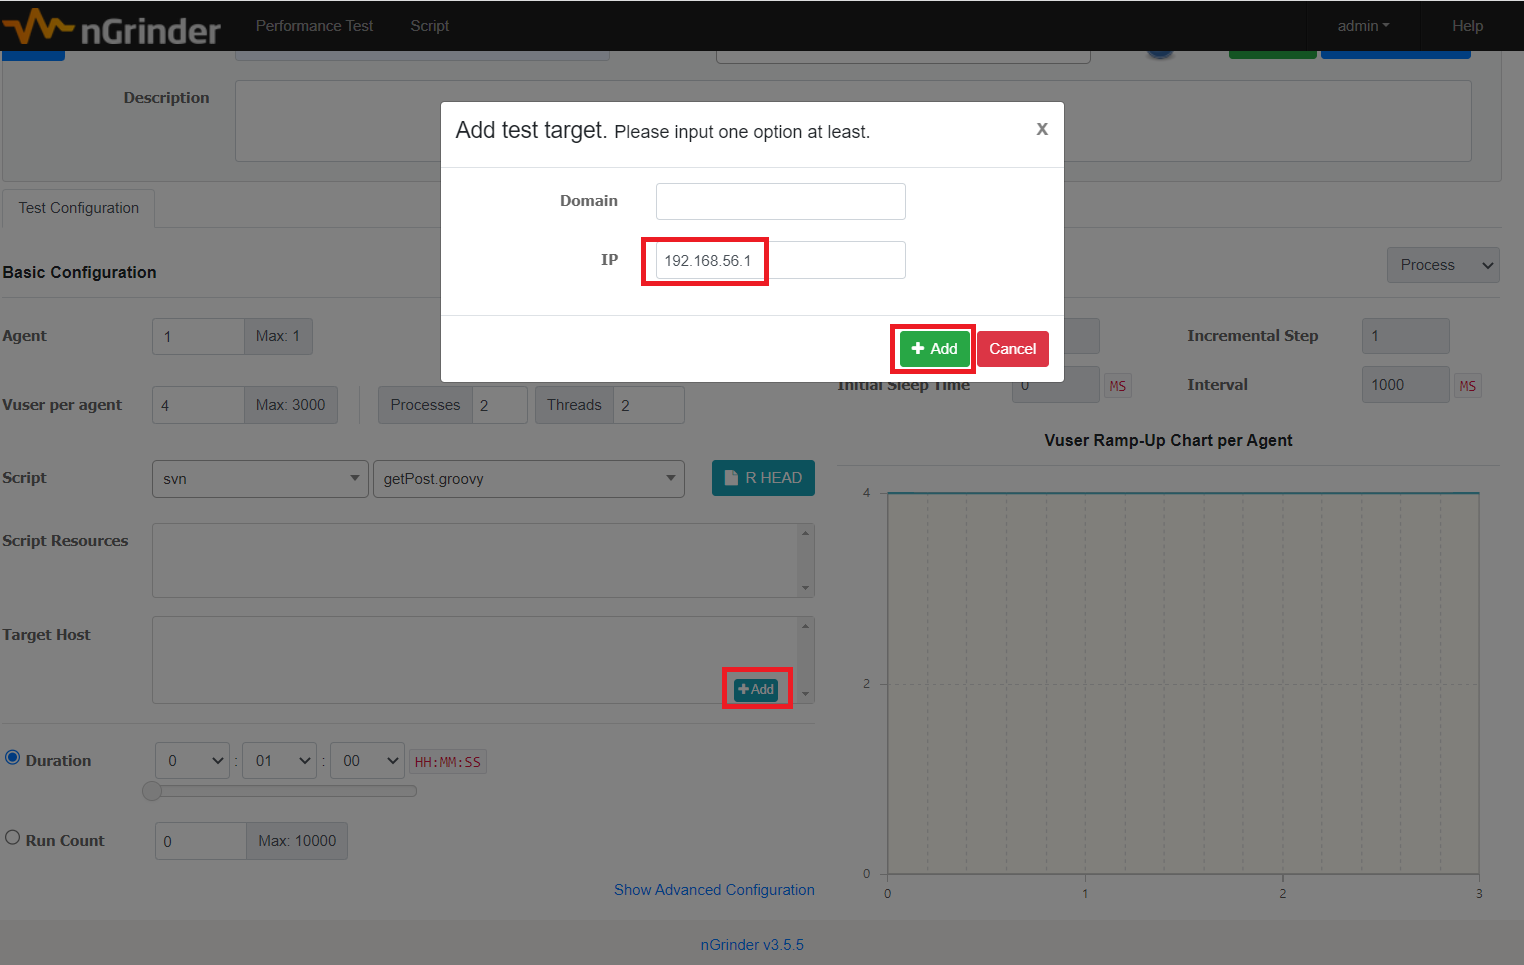
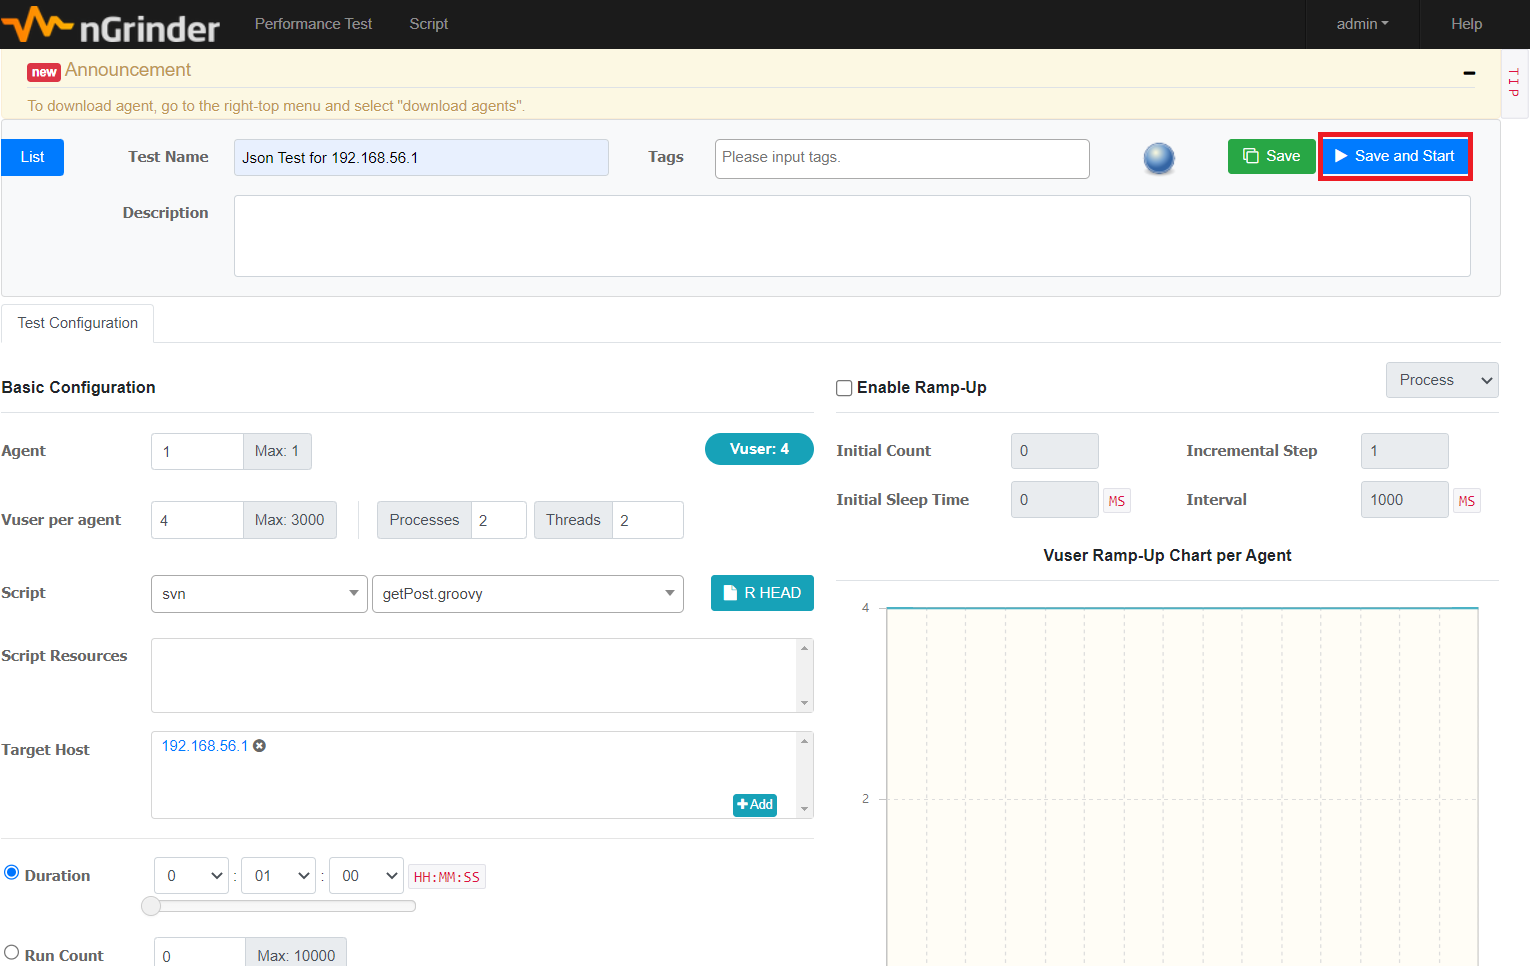
Target Host에 Add 버튼을 누르고 로컬 호스트의 내부 ip를 입력하고 저장한다.
테스트 설정들을 해주고 Save and Start를 누른다.
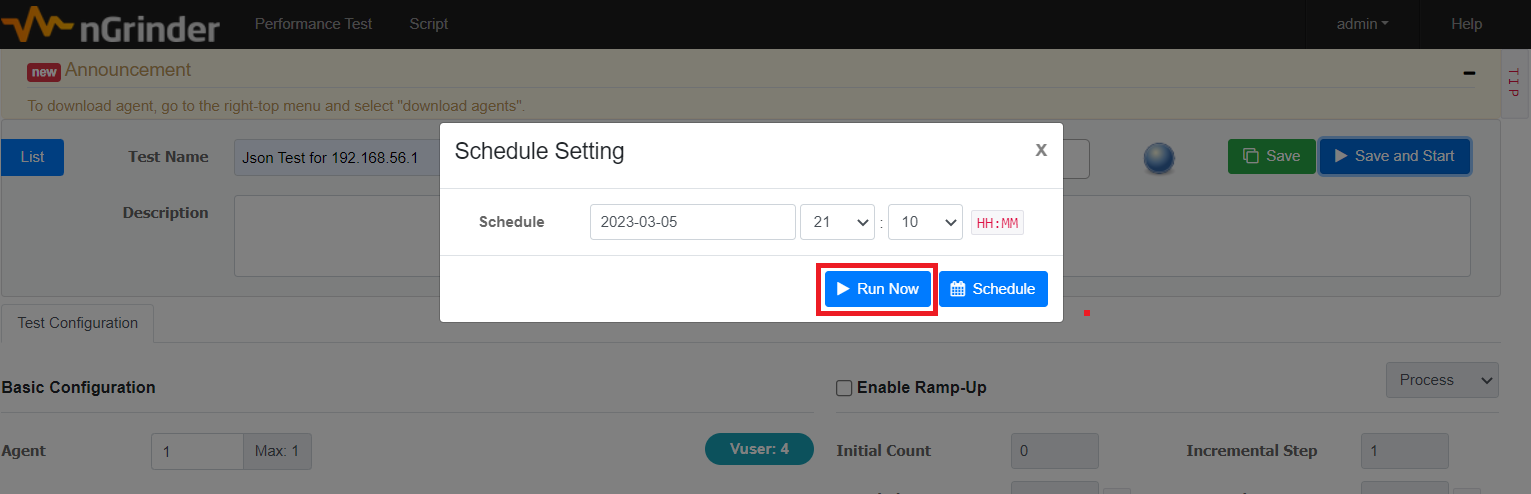
Run Now를 누르고 테스트를 실행한다.
테스트 실행 및 모니터링
실시간으로 테스트가 진행되고 그래프 및 TPS와 데이터가 변하는 것을 확인 가능하다.
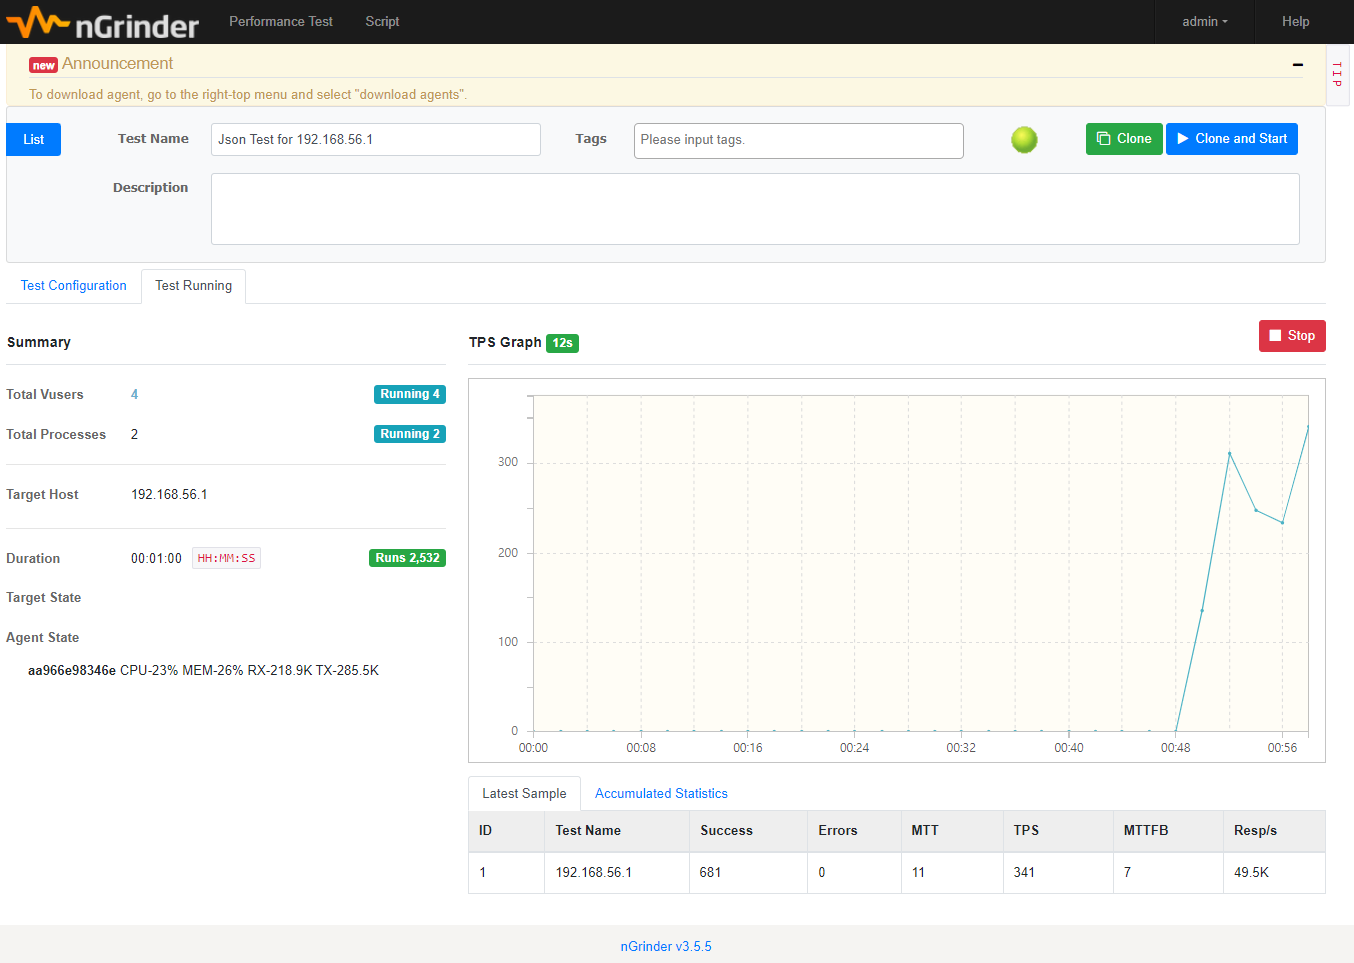
테스트 종료 및 요약
이번에도 좌측 Summary에서 요약 내용을 볼 수 있다.
우측 Detailed Report로 들어가서 상세 보고서를 확인한다.
테스트 상세 보고서
POST /api/post 요청으로 성능 테스트를 진행한 상세 보고서를 확인할 수 있다.
정리
직접 Spring Boot로 GET / POST 메서드를 만들고 nGrinder를 통해서 성능 테스트를 진행했다.
nGrinder의 작업 과정을 정리하고 해당 포스팅을 끝낸다.
- API 작성
- 스크립트 생성
- 테스트 생성
- 테스트 설정
- 테스트 실행 및 모니터링
- 테스트 상세 보고서
다음과 같은 흐름으로 성능 테스트를 진행했다.
'Spring' 카테고리의 다른 글
| Spring Boot jsp 사용 (0) | 2024.03.17 |
|---|---|
| nGrinder 성능 테스트 플랫폼 설치 (0) | 2023.03.05 |
| [Spring][Mybatis][Logger] Spring Log4j를 이용해서 인터셉터로 로그 남기기 & MyBatis 쿼리 로그 출력 및 정렬 (0) | 2020.09.21 |
| [spring] Lombok 이란? (0) | 2020.09.10 |
| [jsp][servlet] Forward VS Redirect(차이점) (0) | 2020.09.03 |


